How to Make a Minecraft Costume - Steve, Creeper and More!


Minecraft continues to be one of the most popular video games. Not only does this game have a mission, but it also gives the player a lot of freedom, allowing us to be creative and make our Minecraft world our own. It's no wonder that once Halloween or a costume party rolls around, we'd want to dress up as. Minecraft character to show our love for the game.
In this oneHOWTO article we're going to show you how to make Minecraft costumes, including Steve, the Ender Dragon, a Creeper, a Minecraft Zombie and the Minecraft TNT.
How to make a Minecraft “Steve” costume
Using a square box, you can make the costume of many Minecraft characters. If you want to surprise people by dressing as Minecraft “Steve”, take note and follow our steps to make a Steve Minecraft costume:
- Take a square cardboard box and fold the lids inward.
- Next, cut the eyes to the level of yours, or whoever is going to disguise Steve as it is also a good Minecraft costume for children, so one can still see correctly while wearing the costume.
- To make the inner part more comfortable, put foam rubber on both sides and glue it on, so it will be more fluffy and it will be perfect to hold the box on your head for longer. In addition, with the foam rubber you will achieve that the box is fixed, thus preventing it from moving and causing discomfort.
- Now that you have the box ready, it's time to make Steve's face, the character chosen for this costume. You have two options for this: either download a template on the internet and adapt it to the size of the box, or use tempera or paper cutouts to create the mosaic of pixelated squares that will represent Steve's face.
- If you use the classic method, you should make the paintings with the following colors: black or brown for the hair and beard, blue for the eyes and different shades of skin color for the skin.
- To make the body you also have two options: either complete the look with jeans and a light blue shirt, or continue creating the costume with more boxes.
- The body will be divided into three separate pieces, you can join them later with liquid glue or leave them separately for much more mobility.
- Use rectangular boxes, covered at the ends, to create the arms. Remember that they should have the same measurement as the arm of the person who is going to dress up, so in case a box does not work for you, you can join it using ties or glue.
- The sleeves must be the same light blue as the body and then skin colored for the rest of the arms and hands, simulating a short-sleeved shirt.
- To improve comfort, drill two holes at the top of the end of the hands (not the front, see photo below), through which you can also hold Steve's famous sword or other tools.
- The body will consist of an elongated box painted sky blue. You can leave it open at the bottom so that the legs come out and wear a denim to finish simulating the character or do the same process to create the pants using shades of dark blue.
- For the feet, we recommend wearing brown or black sneakers that are comfortable.
- If you want to make a tool, such as the sword, you can also print it and stick the paper on a cardboard cut out with the appropriate shape or paint it on said cardboard. Another option is to use thick foam rubber or another similar material in shades of blue and brown to create the sword pattern.
Making your own costume is not only less expensive but more fun and creative as you can adapt the costume to your liking, making it even more unique. If you're thinking of making it for your child, include them in the project as kids love to create crafts and it can help them unleash their creativity!

How to make a Minecraft TNT Costume
Another fun Minecraft costume to make is the Minecraft TNT box. To do this, follow our easy steps below:
- Use a large box. This time we will not use it on our head as in the previous costume, but it will be for the body. Therefore, you must make two holes through which you can pass your arms and be completely comfortable, as well as a hole in the upper part to be able to insert your head. Take your measurements well or those of whoever is going to dress up as the Minecraft TNT, since this Minecraft costume has to be as comfortable as possible.
- Once you have the base box made to measure, you must paint it following the design of the dynamite. Paint it red and with the shape of the cartridges, to delimit them you can make a shading of black or darker red, and also leave a band in the center of the body in white, where you can paint the letters “TNT” in a pixilated form, characteristic to Minecraft.
- If you want the costume to be much more original, you can complete the illusion by creating a cord or cable that you can place on top and that will represent the dynamite wick, as well as place a strip of lights that simulate the burning wick.
This Minecraft costume is very quick to make, as well as quite original, making it a great option for a last-minute Halloween costume or any costume party.

How to make a Minecraft Ender Dragon costume
The next costume in our list is the Minecraft Ender Dragon. This costume is perfect for absolutely anyone, no matter their age nor gender. It's also a very original Minecraft costume which you can make yourself!
To make a Minecraft Ender Dragon costume at home, follow these easy steps:
- Take a large square box, big enough to wear on your head, and fold the lids inward.
- Next, cut out circles for your eyes. Remember that they must be square to match with the Minecraft aesthetic. You can cover the area with a black gauze-type fabric so that it is concealed but can be seen well.
- In addition, apart from the eye area to allow visibility, you will have to paint the two large eyes of the dragon with purple, pink or fuchsia, just above the area made to be able to see, as well as paint a piece of the snout simulating the mouth or the tongue if you want it so visible.
- Place a smaller rectangular box on the front of the head, it must be glued horizontally, which will make the muzzle of the Ender Dragon.
- The entire face should be created with black, dark gray and light gray paper or tempera. You must simulate the pixelated squares, both in front, behind and on the sides.
- Using foam rubber or more cardboard, create small rectangles painted gray and glue them to the back of the box to create the Ender Dragon crest. They should go from the head, through the shirt and the tail.
- To create the tail, wear black socks and fill it with newspapers, then sew it to the pants.
- Lastly, create the wings with felt to give it more mobility. Remember that they must be black and you can include white or gray stripes to make the shape of the wings and make them look much better. Then, sew them to the sleeves and armhole of the shirt you will be wearing.
Remember that to go as Ender Dragon it is important to wear all black, so wear comfortable black sneakers with your Ender Dragon costume. The head made from a square box, the crest made from foam or cardboard, the tail and wings made from fabrics or felt will add the finishing touch to this costume.

Minecraft zombie costume
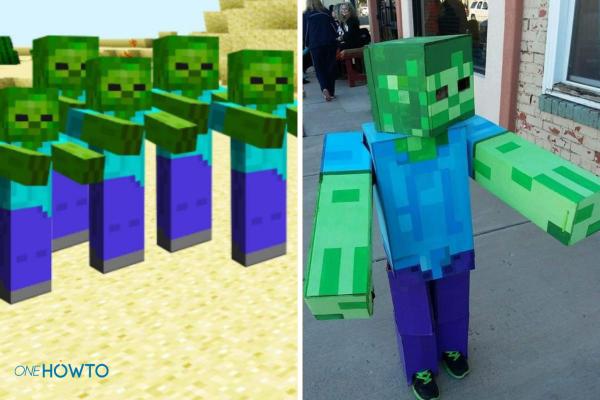
Another great idea is to dress up as the Minecraft Zombie. Not only is this costume easily recognizable, but it's also easy and fun to make yourself. To make the Minecraft Zombie costume follow our instructions:
- Take a square box suitable for the head and fold the lids inward.
- Cut out the holes for the eyes in the shape of a square.
- For it to be the authentic Minecraft zombie you must paint the head with dark green, light green and even green mixed with gray. Remember that they should always be based on little squares as we want it to resemble the pixels in the game.
- To create the body, you will need a larger box that you will have to paint in light blue.
- If you have a green long-sleeved shirt, you don't have to create full sleeves, but you can always make the arms through two rectangular boxes, as we've done with Steve's character.
- The zombie wears short sleeves, so you can make two pieces of light blue cardboard and glue them to the box to simulate short sleeves and then show off your own arms with the green shirt.
- Lastly, don't forget to complete the outfit with some navy blue jeans or prepare more boxes to make the pants with holes for your feet. You should also make it with two pieces to allow your knees to bend when walking.
- For your footwear, you can use black, blue or brown sneakers.
If you're enjoying these costume ideas, you may also want to check out our tutorial on how to make a Son Goku costume for kids or how to make The Incredibles costumes.

Minecraft Creeper Costume
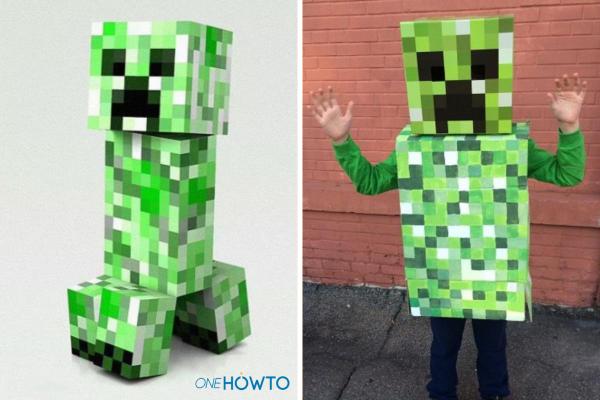
Another good option is to create the Minecraft Creeper costume. As with the previous costumes, you can make the Minecraft Creeper costume by using cardboard boxes and paint. To do so, follow these instructions:
- Take a good size square box to make the head and fold the lids inside.
- Cut out the eye holes in the shape of a square.
- Following an image of the reference of Creeper's face, make a mosaic reproducing the pixelated squares. The head should be many different shades of green, including one that is green with a hint of yellow or gray, and the mouth and eye contour should be black and dark green. You can also print it with color and paste it on the cardboard box.
- Once you have the head, prepare a larger box to make the body. Remember to make two holes at the height of the arms and one in the upper part that allows you to insert the head.
- Drawing the body is very simple, you just have to continue creating the mosaic with the various green tones, from very light green to dark green, but not as dark as the one used for the contour of the eyes and mouth.
- Lastly, to give it that finishing touch, wear completely green, both the shirt and the pants if possible. Your sneakers can be black or dark green.

Want more inspiration? Watch MINECON 2015 costume competition to see other Minecraft costume ideas! You can also read our articles about how to make an amoung us costume or how to make an Ash Kecthum (Pokemon) costume for more costume ideas.

If you want to read similar articles to How to Make a Minecraft Costume - Steve, Creeper and More!, we recommend you visit our Festivities & Celebrations category.


